1日1プラグイン。そんな今回はウィジェット機能のあるプラグインを作りたいと思います。
残念ながら私は毎日業務でプログラムを書いているわけではないので、色々やっているうちに忘れてしまう危険があります・・・!!そんなわけで、プログラム系もぼちぼち記事にしていこうと思います。
バックナンバー
- WordPress プラグイン 簡単作成 Hello Dollyをカスタマイズ
- WordPress 管理画面 プラグイン作成 Twitter APIで投稿
- WordPress ウィジェット プラグイン 作成
- WordPress DBを使ったプラグイン 作成 昔ながらのアクセスカウンターを作る
まずはリファレンスを見ていきます。
ウィジェットの登録
@see テーマのウィジェット対応
以下をテーマの functions.php ファイルに追加してください。
|
1 2 3 4 5 6 7 8 9 10 11 12 13 14 15 16 17 |
<?php /** * Register our sidebars and widgetized areas. * */ function arphabet_widgets_init() { register_sidebar( array( 'name' => 'Home right sidebar', 'id' => 'home_right_1', 'before_widget' => '<div>', 'after_widget' => '</div>', 'before_title' => '<h2 class="rounded">', 'after_title' => '</h2>', ) ); } add_action( 'widgets_init', 'arphabet_widgets_init' ); |
|
1 |
arphabet_widgets_init() |
サイドバーの登録方法です。
WordPress ウィジェット API
@see WordPress ウィジェット API
|
1 2 3 4 5 6 7 8 9 10 11 12 13 14 15 16 17 18 19 20 21 22 23 24 25 26 27 28 29 30 31 32 33 34 35 36 37 38 |
class My_Widget extends WP_Widget { /** * ウィジェット名などを設定 */ public function __construct() { // widget actual processes } /** * ウィジェットの内容を出力 * * @param array $args * @param array $instance */ public function widget( $args, $instance ) { // outputs the content of the widget } /** * 管理用のオプションのフォームを出力 * * @param array $instance ウィジェットオプション */ public function form( $instance ) { // 管理用のオプションのフォームを出力 } /** * ウィジェットオプションの保存処理 * * @param array $new_instance 新しいオプション * @param array $old_instance 以前のオプション */ public function update( $new_instance, $old_instance ) { // ウィジェットオプションの保存処理 } } |
丁寧にCodexがあるので有難いですね、概要を把握したらこれを雛形に作っていきます。
実際に作っていきます。
|
1 2 |
# pwd /var/www/html/wp/wp-content/plugins |
|
1 |
# mkdir sgwidget |
|
1 |
# cd sgwidget |
|
1 |
# vi /var/www/html/wp/wp-content/plugins/sgwidget/sgwidget.php |
|
1 2 3 4 5 6 7 8 9 10 11 12 13 14 15 16 17 18 19 20 21 22 23 24 25 26 27 28 29 30 31 32 33 34 35 36 37 38 39 40 41 42 43 44 45 46 47 48 49 50 51 52 53 54 55 56 57 58 59 60 61 62 63 64 65 66 67 68 69 70 71 72 73 74 75 76 77 78 79 80 81 82 83 84 85 86 87 88 89 90 91 92 93 94 95 96 97 98 99 100 101 102 103 104 105 106 107 108 109 110 111 112 113 114 115 116 117 118 119 120 121 122 123 124 125 126 127 128 129 130 131 132 133 134 135 136 137 138 139 140 141 142 143 144 145 146 147 148 149 150 151 152 153 154 155 156 157 158 159 160 161 162 163 164 165 166 167 168 169 170 171 172 173 174 |
<?php /** * @package SgAdWidget * @version 0.1.1 */ /* Plugin Name: SgAdWidget Plugin URI: http://example.com/plugins/sgwidget/ Description: Plugin development tutorial for making plugin by using widget Author: Kanehiro Yuu Version: 0.1.1 Author URI: https://sys-guard.com/ */ //実行するよ! $SgAdWidgetObj = new Sg_Ad_Widget(); class Sg_Ad_Widget extends WP_Widget { private $widget_ops; private $control_ops; public $id = ""; public $name = ""; public $title = ""; public $text = ""; private $instance; private $new_instance; private $old_instance; private $args; public function __construct() { //ウィジェットスペースのアクション実行 add_action( 'widgets_init', array($this, 'sg_add_widget') ); //ウィジェットオプション $this->widget_ops = array('description' => 'Google Adsense'); $this->control_ops = array('width' => 200, 'height' => 350); //ウィジェットを登録 parent::__construct( ad_widget, // Base ID 'Adsense', //name $this->widget_ops, $this->control_ops ); } //ウィジェット、ウィジェットスペースの設定と登録 public function sg_add_widget() { //ウィジェットをWordPressに登録する ※PHP5.3以上 register_widget( 'Sg_Ad_Widget' ); //ウィジェットスペースの設定 register_sidebar( array( 'name' => '広告スペース', 'id' => 'ad_sidebar', 'before_widget' => '<div>', 'after_widget' => '</div>', 'before_title' => '', 'after_title' => '' ) ); } // ウィジェット 入力フォーム出力 ========================================== /** * バックエンドのウィジェットフォーム * * @see WP_Widget::form() * * @param array $instance データベースからの前回保存された値 */ public function form( $instance ) { //タイトルエリア $this->instance = $instance; if(isset($this->instance['title']) == true ){ $this->title = $this->instance['title']; }else{ $this->title = ''; } $this->id = parent::get_field_id('title'); $this->name = parent::get_field_name('title'); echo '<p>'; echo 'タイトル:<br/>'; printf( '<input rows="16" cols="45" type="text" id="%s" name="%s" value="%s">', $this->id, $this->name, esc_attr($this->title) ); echo '</p>'; //テキストエリア if(isset($this->instance['text']) == true ){ $this->text = $this->instance['text']; }else{ $this->text = ''; } $this->id = parent::get_field_id('text'); $this->name = parent::get_field_name('text'); echo '<p>'; echo 'スクリプトタグ:<br/>'; printf( '<textarea rows="16" cols="45" id="%s" name="%s" >%s</textarea>', $this->id, $this->name, $this->text ); echo '</p>'; } // ウィジェット 入力フォーム出力 ここまで ========================================== /** * ウィジェットフォームの値を保存用にサニタイズ * * @see WP_Widget::update() * * @param array $new_instance 保存用に送信された値 * @param array $old_instance データベースからの以前保存された値 * * @return array 保存される更新された安全な値 */ public function update( $new_instance, $old_instance ) { $this->new_instance = $new_instance; return $this->new_instance; } /** * ウィジェットのフロントエンド表示 * * @see WP_Widget::widget() * * @param array $args ウィジェットの引数 * @param array $instance データベースの保存値 */ public function widget($args, $instance) { $this->args = $args; $this->instance = $instance; echo $this->args['before_widget']; echo $this->args['before_title']; echo esc_html( $this->instance['title'] ); echo $this->args['after_title']; echo $this->instance['text']; echo $this->args['after_widget']; } }//Sg_Ad_Widget |
テーマファイル内sidebar.phpにウィジェットを出力する関数を書き込む
|
1 2 3 4 5 6 7 8 9 10 11 |
# vi /var/www/html/wp/wp-content/themes/twentyseventeen/sidebar.php if ( ! is_active_sidebar( 'sidebar-1' ) ) { return; } ?> <aside id="secondary" class="widget-area" role="complementary"> <?php dynamic_sidebar( 'sidebar-1' ); ?> </aside><!-- #secondary --> |
|
1 2 3 4 5 6 7 8 9 10 11 12 13 14 |
if ( ! is_active_sidebar( 'ad_sidebar' ) ) { return; } if ( ! is_active_sidebar( 'sidebar-1' ) ) { return; } ?> <aside id="secondary" class="widget-area" role="complementary"> <?php dynamic_sidebar('ad_sidebar'); ?> <?php dynamic_sidebar( 'sidebar-1' ); ?> </aside><!-- #secondary --> |
|
1 |
<?php dynamic_sidebar('ad_sidebar'); ?> |
有効化してみよう
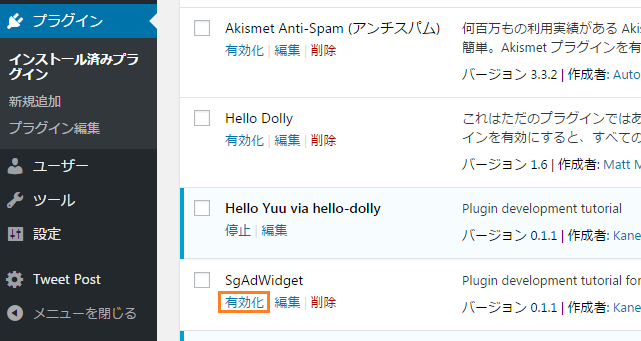
有効化します。

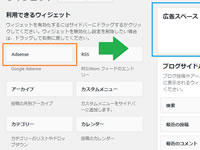
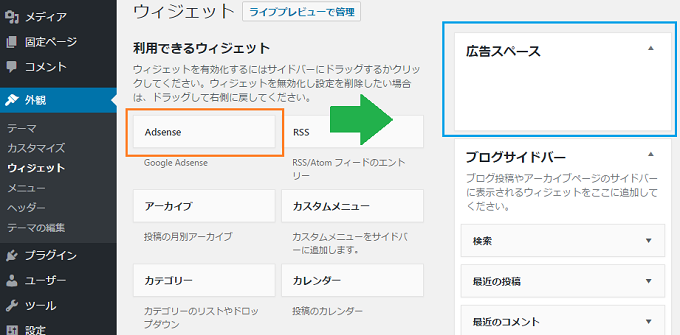
【概観】>> 【ウィジェット】を選択すると、『Adsense』ウィジェットと『広告スペース』が生成されているので、ドラッグアンドドロップを行って有効化させます。
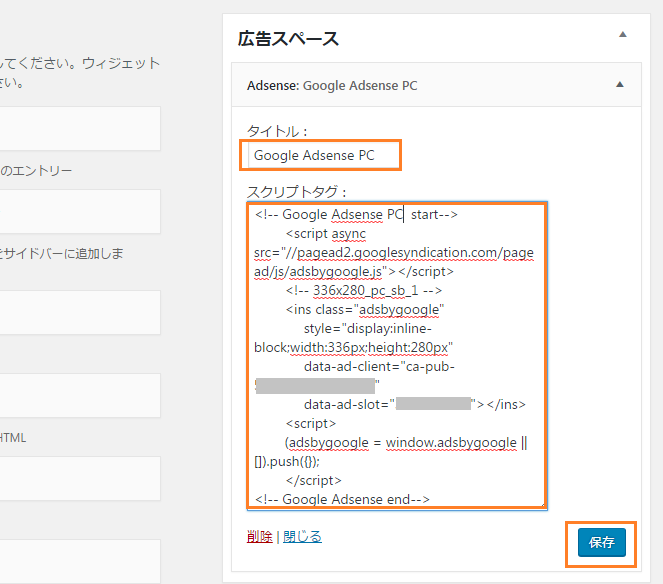
Googleのadsenseタグを貼りつけて、【保存】をクリックします。これでサイドバーのウィジェットに表示がされます。
|
1 |
<?php dynamic_sidebar('ad_sidebar'); ?> |
上記のタグをテーマファイルの任意のファイルや、コードの箇所に張ることによって、出現位置を自由に任意で設定できます。
今回はウィジェットに関するを作りました。各種広告のスクリプトタグを貼り付けるようなものですが、プラグイン内で関数を作って、専用のウィジェットで指定してある関数を実行するようにしても良いですね。
ウィジェットにPHPコードを記述させたい場合
『WordPress プラグイン 簡単作成 Hello Dollyをカスタマイズ』の記事で御紹介したいように、プラグイン内に関数を規定して、ウィジェットにショートコードを張って実装させるのも安全です。お客さんは好きな位置にウィジェット機能を使ってコードを設置出来ますし、ショートタグを使うことで、お客さんの誤操作でページが真っ白になってしまう!などという自体を避けることが出来ます。
お疲れ様です。
@see WordPressプラグイン開発のバイブル

