WordPresssのプラグインは驚くほど簡単に作れます。開発者向けのサンプルとしてデフォルトで入っているであろう『Hello Dolly』プラグインを見ていくことでプラグインの仕組みを眺めます。WordPressのプラグインは1ファイルで成立するぐらいとても敷居が低いので、今日からでも作れるようになるはず。
バックナンバー
- WordPress プラグイン 簡単作成 Hello Dollyをカスタマイズ
- WordPress 管理画面 プラグイン作成 Twitter APIで投稿
- WordPress ウィジェット プラグイン 作成
- WordPress DBを使ったプラグイン 作成 昔ながらのアクセスカウンターを作る
WordPressのカスタマイズ経験者なら秒速で実装できる
WordPressのカスタマイズと言えばfunctions.phpに関数を記述してactionやhookに渡すように記述していきますよね。それをプラグイン用のファイルの規則に従って記述するだけなのです!
プラグイン化のメリット
よく使うfunctions.phpへのカスタマイズ処理をプラグインとして作っておくと、使いまわしもしやすいのでおすすめです。利用する時だけ有効にする、そういう使い方もできるようになります。
Hello Dollyプラグインって何もの?
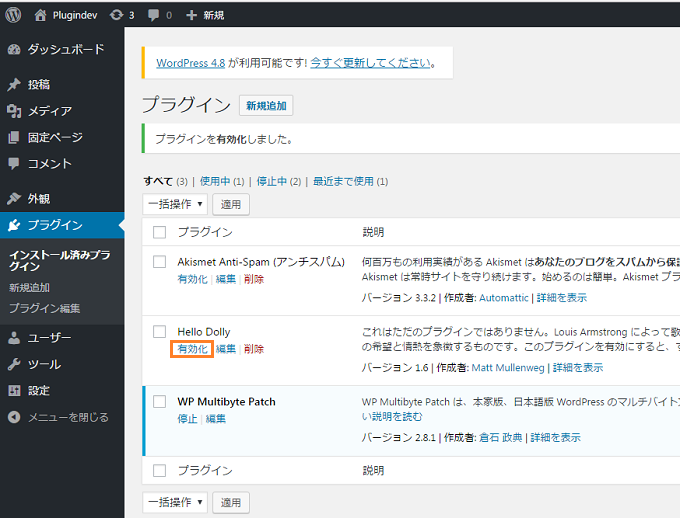
結果
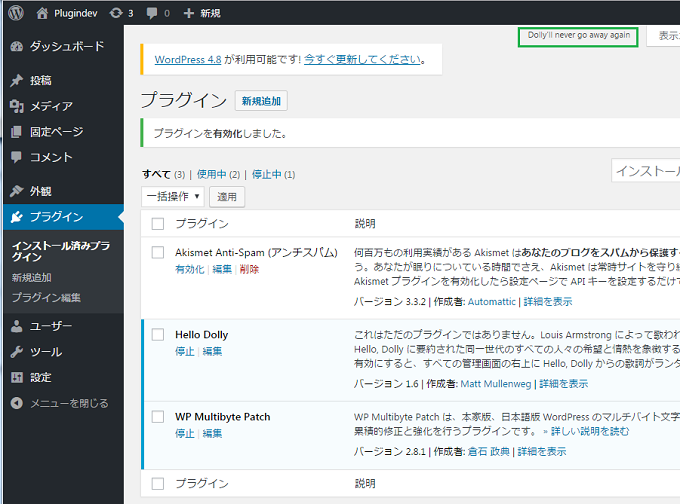
右上に詩が表示されます。
Hello Dollyのコードを見てみよう
|
1 2 |
# pwd /var/www/html/wp/wp-content/plugins |
|
1 2 3 4 5 6 7 8 9 |
# ls -laht 合計 8.0K drwxr-xr-x 4 hoge apache 81 6月 22 11:44 . drwxr-xr-x 6 hoge apache 84 6月 22 11:44 .. -rw-r--r-- 1 hoge apache 2.3K 6月 22 11:44 hello.php drwxr-xr-x 4 hoge apache 154 5月 17 23:23 wp-multibyte-patch drwxr-xr-x 4 hoge apache 257 5月 17 23:23 akismet -rw-r--r-- 1 hoge apache 28 6月 6 2014 index.php |
Hello Dollyプラグインは1ファイルでできています。出力してみましょう。
|
1 2 3 4 5 6 7 8 9 10 11 12 13 14 15 16 17 18 19 20 21 22 23 24 25 26 27 28 29 30 31 32 33 34 35 36 37 38 39 40 41 42 43 44 45 46 47 48 49 50 51 52 53 54 55 56 57 58 59 60 61 62 63 64 65 66 67 68 69 70 71 72 73 74 75 76 77 78 79 80 81 82 83 84 85 |
# cat hello.php <?php /** * @package Hello_Dolly * @version 1.6 */ /* Plugin Name: Hello Dolly Plugin URI: http://wordpress.org/plugins/hello-dolly/ Description: This is not just a plugin, it symbolizes the hope and enthusiasm of an entire generation summed up in two words sung most famously by Louis Armstrong: Hello, Dolly. When activated you will randomly see a lyric from <cite>Hello, Dolly</cite> in the upper right of your admin screen on every page. Author: Matt Mullenweg Version: 1.6 Author URI: http://ma.tt/ */ function hello_dolly_get_lyric() { /** These are the lyrics to Hello Dolly */ $lyrics = "Hello, Dolly Well, hello, Dolly It's so nice to have you back where you belong You're lookin' swell, Dolly I can tell, Dolly You're still glowin', you're still crowin' You're still goin' strong We feel the room swayin' While the band's playin' One of your old favourite songs from way back when So, take her wrap, fellas Find her an empty lap, fellas Dolly'll never go away again Hello, Dolly Well, hello, Dolly It's so nice to have you back where you belong You're lookin' swell, Dolly I can tell, Dolly You're still glowin', you're still crowin' You're still goin' strong We feel the room swayin' While the band's playin' One of your old favourite songs from way back when Golly, gee, fellas Find her a vacant knee, fellas Dolly'll never go away Dolly'll never go away Dolly'll never go away again"; // Here we split it into lines $lyrics = explode( "\n", $lyrics ); // And then randomly choose a line return wptexturize( $lyrics[ mt_rand( 0, count( $lyrics ) - 1 ) ] ); } // This just echoes the chosen line, we'll position it later function hello_dolly() { $chosen = hello_dolly_get_lyric(); echo "<p id='dolly'>$chosen</p>"; } // Now we set that function up to execute when the admin_notices action is called add_action( 'admin_notices', 'hello_dolly' ); // We need some CSS to position the paragraph function dolly_css() { // This makes sure that the positioning is also good for right-to-left languages $x = is_rtl() ? 'left' : 'right'; echo " <style type='text/css'> #dolly { float: $x; padding-$x: 15px; padding-top: 5px; margin: 0; font-size: 11px; } </style> "; } add_action( 'admin_head', 'dolly_css' ); ?> |
|
1 |
hello_dolly_get_lyric() { |
hello_dooly_get_lyric()関数で詩が一行ずつ記述されているのがわかります。
カスタマイズしよう
Hello Dollyをカスタマイズする形でプラグインを作成します。管理しやすいようにディレクトリを作ります。
|
1 |
# mkdir /var/www/html/wp/wp-content/plugins/hello-yuu |
下記のように記述を行いました。
|
1 2 3 4 5 6 7 8 9 10 11 12 13 14 15 16 17 18 19 20 21 22 23 24 25 26 27 28 29 30 31 32 33 34 35 36 37 38 39 40 41 42 43 44 45 46 47 48 49 50 51 52 53 |
# vi /var/www/html/wp/wp-content/plugins/hello-yuu/hello_Yuu.php <?php /** * @package Hello Yuu via hello-dolly * @version 0.1.1 */ /* Plugin Name: Hello Yuu via hello-dolly Plugin URI: http://example.com/plugins/hello-yuu/ Description: Plugin development tutorial Author: Kanehiro Yuu Version: 0.1.1 Author URI: https://sys-guard.com/ */ function sg_hello_get_words() { /** These are the lyrics to Hello Dolly */ $sghello = "Hello, Yuu"; return $sghello; } // This just echoes the chosen line, we'll position it later function hello_yuu() { $chosen = sg_hello_get_words(); echo "<p id='dolly'>$chosen</p>"; } // Now we set that function up to execute when the admin_notices action is called add_action( 'admin_notices', 'hello_yuu' ); // We need some CSS to position the paragraph function hello_yuu_css() { // This makes sure that the positioning is also good for right-to-left languages $x = is_rtl() ? 'left' : 'right'; echo " <style type='text/css'> #dolly { float: $x; padding-$x: 15px; padding-top: 5px; margin: 0; font-size: 11px; } </style> "; } add_action( 'admin_head', 'hello_yuu_css' ); add_shortcode("SG-Hello", "hello_yuu"); |
コード量を減らしてわかりやすいようにシンプルにしました。
|
1 |
Plugin Name: Hello Yuu via hello-dolly |
プラグイン名の指定箇所が最も重要です。プラグイン名を重複しないように設定しましょう。
|
1 |
add_shortcode("SG-Hello", "hello_yuu"); |
ショートコードにも対応しました。[SG-Hello]と記述するとhello_yuu()関数が作動する仕組みです。
有効化してみる
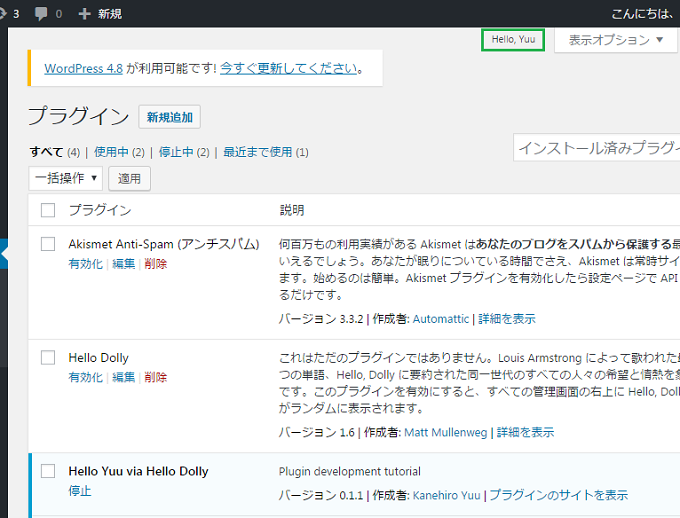
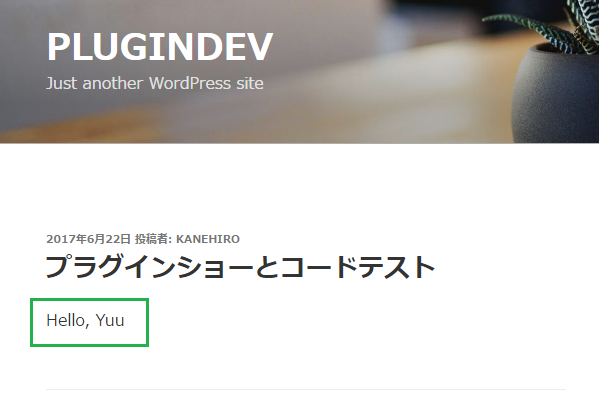
ショートコードが実現されているか確認します。
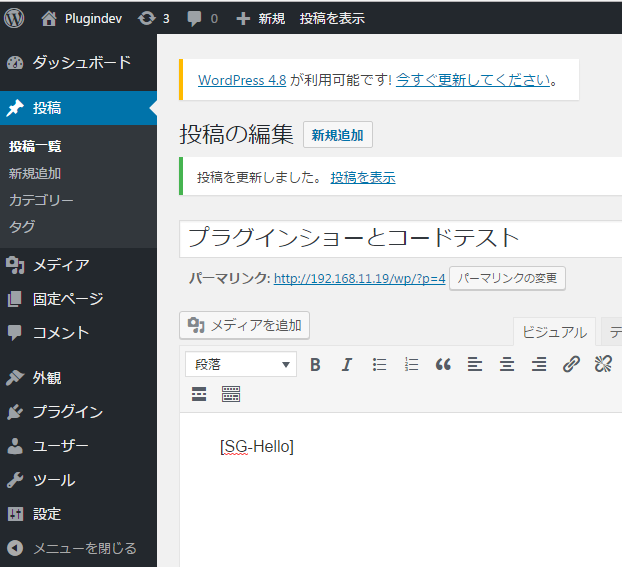

ショートコードが実行されていることがわかります。
クラス化しよう
他のプラグインの変数や関数と重複すると怖いので、クラス形式の記述に変更します。
|
1 2 3 4 5 6 7 8 9 10 11 12 13 14 15 16 17 18 19 20 21 22 23 24 25 26 27 28 29 30 31 32 33 34 35 36 37 38 39 40 41 42 43 44 45 46 47 48 49 50 51 52 53 54 55 56 57 58 59 60 61 62 63 64 65 66 67 68 69 70 71 72 |
<?php /** * @package Hello Yuu via hello-dolly * @version 0.1.1 */ /* Plugin Name: Hello Yuu via hello-dolly Plugin URI: http://example.com/plugins/hello-yuu/ Description: Plugin development tutorial Author: Kanehiro Yuu Version: 0.1.1 Author URI: https://sys-guard.com/ */ class Say_Hello { private $sghello = ""; private $chosen = ""; private $x = ""; public function __construct(){ $this->admin_init(); } //フック・アクションを実行 public function admin_init(){ add_action( 'admin_notices', array($this, 'hello_yuu') ); add_action( 'admin_head', array($this, 'hello_yuu_css') ); add_shortcode('SG-Hello', array($this, 'hello_yuu') ); } //挨拶関数 入力します public function sg_hello_get_words() { /** These are the lyrics to Hello Dolly */ $sghello = "Hello, Yuu"; return $sghello; } //挨拶関数 出力します public function hello_yuu() { $chosen = $this->sg_hello_get_words(); echo "<p id='dolly'>$chosen</p>"; } //挨拶関数 CSS装飾 public function hello_yuu_css() { // This makes sure that the positioning is also good for right-to-left languages $x = is_rtl() ? 'left' : 'right'; echo " <style type='text/css'> #dolly { float: $x; padding-$x: 15px; padding-top: 5px; margin: 0; font-size: 11px; } </style> "; } } //実行するよ! $Aisatu = new Say_Hello(); |
クラス化する際の注意点として、add_action関数でクラス内のメソッド(コールバック関数)を呼び出す場合、引数にarray()を使って配列で呼び出すクラスを指定してメソッドを呼び出さないといけないことぐらいでしょうか。
|
1 2 3 |
add_action('admin_notices', 'hello_yuu'); add_action('admin_head', 'hello_yuu_css'); add_shortcode('SG-Hello', 'hello_yuu'); |
↓変更
|
1 2 3 |
add_action('admin_notices', array($this, 'hello_yuu') ); add_action('admin_head', array($this, 'hello_yuu_css') ); add_shortcode('SG-Hello', array($this, 'hello_yuu') ); |
WordPressのプラグインは実は凄く簡単に作れることがわかって頂けたかと思います。次は管理画面にデータを追加したり、管理ページを追加して実践的な実装の御紹介を考えています。
お疲れ様です。


