Nginxのキャッシュをブラウザから管理できるcache purgeモジュールの導入方法です。
ダウンロードディレクトリの作成
|
1 |
# mkdir /usr/local/src/nginx |
|
1 |
# cd /usr/local/src/nginx |
今回はNginx1.6.0版を選択。
|
1 |
# wget http://nginx.org/download/nginx-1.6.0.tar.gz |
モジュールをダウンロード
ついでにopensslも。
|
1 2 |
# wget http://labs.frickle.com/files/ngx_cache_purge-2.1.tar.gz # wget http://www.openssl.org/source/openssl-1.0.1g.tar.gz |
展開します。
|
1 2 3 |
# tar xvzf nginx-1.6.0.tar.gz # tar xvzf openssl-1.0.1g.tar.gz # tar xvzf ngx_cache_purge-2.1.tar.gz |
Nginxのcache purge付きインストール
Nginxのディレクトリに移動します。
|
1 |
# cd nginx-1.6.0 |
コンフィギュア。環境に合わせて下さい。
|
1 |
# ./configure --prefix=/usr/local/nginx-1.6.0 --sbin-path=/usr/local/sbin/nginx --conf-path=/etc/nginx/nginx.conf --error-log-path=/var/log/nginx/error.log --http-log-path=/var/log/nginx/access.log --http-client-body-temp-path=/var/lib/nginx/tmp/client_body --http-proxy-temp-path=/var/lib/nginx/tmp/proxy --http-fastcgi-temp-path=/var/lib/nginx/tmp/fastcgi --http-uwsgi-temp-path=/var/lib/nginx/tmp/uwsgi --http-scgi-temp-path=/var/lib/nginx/tmp/scgi --pid-path=/var/run/nginx.pid --lock-path=/var/lock/subsys/nginx --user=nginx --group=nginx --with-file-aio --with-ipv6 --with-http_ssl_module --with-http_realip_module --with-http_addition_module --with-http_xslt_module --with-http_image_filter_module --with-http_sub_module --with-http_dav_module --with-http_flv_module --with-http_mp4_module --with-http_gzip_static_module --with-http_random_index_module --with-http_secure_link_module --with-http_degradation_module --with-http_stub_status_module --with-mail --with-mail_ssl_module --with-cc-opt='-O2 -g -pipe -Wall -Wp,-D_FORTIFY_SOURCE=2 -fexceptions -fstack-protector --param=ssp-buffer-size=4 -m64 -mtune=generic' --with-ld-opt=-Wl,-E --with-openssl=/usr/local/src/nginx/openssl-1.0.1g --add-module=/usr/local/src/nginx/ngx_cache_purge-2.1 |
インストール
|
1 |
# make && make install |
シンボリックリンクを張ります。
|
1 |
# ln -s /usr/local/nginx-1.6.1 /usr/local/nginx |
構文チェック
|
1 2 3 4 5 |
# /usr/local/sbin/nginx -t nginx: the configuration file /etc/nginx/nginx.conf syntax is ok nginx: [emerg] mkdir() "/var/lib/nginx/tmp/client_body" failed (2: No such file or directory) nginx: configuration file /etc/nginx/nginx.conf test failed |
なにやらエラーが出てますね。
ディレクトリを作ってあげます。
|
1 |
# mkdir -p /var/lib/nginx/tmp/client_body |
nginxユーザ作成
|
1 2 3 |
# groupadd nginx # useradd -g nginx nginx # usermod -s /bin/false nginx |
改めて構文チェックを行います。
|
1 2 3 |
# nginx -t nginx: the configuration file /etc/nginx/nginx.conf syntax is ok nginx: configuration file /etc/nginx/nginx.conf test is successful |
Nginx起動スクリプト作成
|
1 2 3 4 5 6 7 8 9 10 11 12 13 14 15 16 17 18 19 20 21 22 23 24 25 26 27 28 29 30 31 32 33 34 35 36 37 38 39 40 41 42 43 44 45 46 47 48 49 50 51 52 53 54 55 56 57 58 59 60 61 62 63 64 65 66 67 68 69 70 71 72 73 74 75 76 77 78 79 80 81 82 83 84 85 86 87 88 89 90 91 92 93 94 95 96 97 98 99 100 101 102 103 104 105 106 107 108 109 110 111 112 113 114 115 116 117 118 119 120 121 122 123 124 125 126 127 128 129 130 131 132 133 134 135 136 137 138 139 140 141 142 143 144 145 146 147 148 |
# vi /etc/init.d/nginx #!/bin/sh # # nginx - this script starts and stops the nginx daemon # # chkconfig: - 85 15 # description: Nginx is an HTTP(S) server, HTTP(S) reverse \ # proxy and IMAP/POP3 proxy server # processname: nginx # config: /etc/nginx/nginx.conf # config: /etc/sysconfig/nginx # pidfile: /var/run/nginx.pid # Source function library. . /etc/rc.d/init.d/functions # Source networking configuration. . /etc/sysconfig/network # Check that networking is up. [ "$NETWORKING" = "no" ] && exit 0 #nginx="/usr/sbin/nginx" nginx=${NGINX-/usr/local/sbin/nginx} prog=$(basename $nginx) sysconfig="/etc/sysconfig/$prog" lockfile="/var/lock/subsys/nginx" pidfile="/var/run/${prog}.pid" NGINX_CONF_FILE="/etc/nginx/nginx.conf" [ -f $sysconfig ] && . $sysconfig start() { [ -x $nginx ] || exit 5 [ -f $NGINX_CONF_FILE ] || exit 6 echo -n $"Starting $prog: " daemon $nginx -c $NGINX_CONF_FILE retval=$? echo [ $retval -eq 0 ] && touch $lockfile return $retval } stop() { echo -n $"Stopping $prog: " killproc -p $pidfile $prog retval=$? echo [ $retval -eq 0 ] && rm -f $lockfile return $retval } restart() { configtest_q || return 6 stop start } reload() { configtest_q || return 6 echo -n $"Reloading $prog: " killproc -p $pidfile $prog -HUP echo } configtest() { $nginx -t -c $NGINX_CONF_FILE } configtest_q() { $nginx -t -q -c $NGINX_CONF_FILE } rh_status() { status $prog } rh_status_q() { rh_status >/dev/null 2>&1 } # Upgrade the binary with no downtime. upgrade() { local oldbin_pidfile="${pidfile}.oldbin" configtest_q || return 6 echo -n $"Upgrading $prog: " killproc -p $pidfile $prog -USR2 retval=$? sleep 1 if [[ -f ${oldbin_pidfile} && -f ${pidfile} ]]; then killproc -p $oldbin_pidfile $prog -QUIT success $"$prog online upgrade" echo return 0 else failure $"$prog online upgrade" echo return 1 fi } # Tell nginx to reopen logs reopen_logs() { configtest_q || return 6 echo -n $"Reopening $prog logs: " killproc -p $pidfile $prog -USR1 retval=$? echo return $retval } case "$1" in start) rh_status_q && exit 0 $1 ;; stop) rh_status_q || exit 0 $1 ;; restart|configtest|reopen_logs) $1 ;; force-reload|upgrade) rh_status_q || exit 7 upgrade ;; reload) rh_status_q || exit 7 $1 ;; status|status_q) rh_$1 ;; condrestart|try-restart) rh_status_q || exit 7 restart ;; *) echo $"Usage: $0 {start|stop|reload|configtest|status|force-reload|upgrade|restart|reopen_logs}" exit 2 esac |
実行権限付与して起動させます。
|
1 |
# chmod 711 /etc/init.d/nginx |
|
1 |
# /etc/init.d/nginx start |
http://サーバーIPアドレス/
動いていることを確認。ひと段落ですね。
|
1 2 3 |
# vi /etc/sysconfig/nginx NGINX=/usr/local/sbin/nginx |
Nginx自動起動設定
|
1 2 3 4 5 6 7 8 9 |
# chkconfig --add nginx # chkconfig nginx on # chkconfig --list nginx nginx 0:off 1:off 2:on 3:on 4:on 5:on 6:off # nginx -t nginx: the configuration file /etc/nginx/nginx.conf syntax is ok nginx: configuration file /etc/nginx/nginx.conf test is successful |
|
1 2 |
# nginx -v nginx version: nginx/1.6.0 |
一応バックアップ
|
1 |
# cp /etc/nginx/nginx.conf /etc/nginx/nginx.conf.org |
バーチャルホストのserverディレクティブに以下を挿入して下さい。
|
1 2 3 4 5 6 |
# cache purge location ~ /purge(/.*) { #allow 127.0.0.1; #deny all; proxy_cache_purge czone "$scheme://$host$1$is_args$args$mobile"; } |
設定を反映させます。
|
1 |
# /etc/init.d/ngix restart |
キャッシュの消し方
消したいURLにアクセスする。
http://サーバIP/purge/削除したいURI
WordPressの管理画面から制御したい Nginx Cache Controllerプラグイン

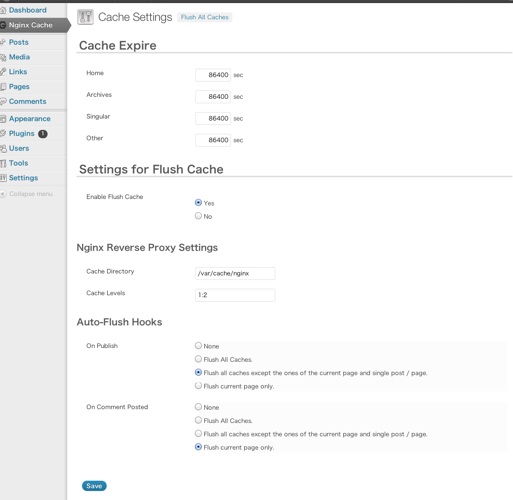
WordPressのプラグインの新規追加から【Nginx Cache Controller】でインストールが出来ます。
 このように管理画面からクリアすることが出来ます。
もう少し詳細に設定出来るものに【Nginx Helper】等あります。自分にとって使いやすいプラグインを探してみるのもいいですね。
なんだか大変そうだなぁと思ったらお問い合わせ下さい。


