Nginx?
nginx は当初、Ramblerが運営する各種ウェブサイトのニーズを満たすために開発された。2008年9月の時点で、nginxはこれらのサイトで1日に5億のリクエストを処理していた。
ネットクラフトの2013年6月の調査に よると、nginxは、全ドメインの中で3番目に多く使われている(14.56%)Webサーバであり、全アクティブサイトの中で2番目に多く使われてい る(12.91%)Webサーバである。W3Techsの調査によると、上位1,000サイトの34.7%、上位100,000サイトの25.9%で使わ れている。BuiltWithによると、上位1万Webサイトの18%で使われており、上位1万、10万、100万の区分において成長を続けている。@see wikipedia
@see Nginx日本語ドキュメント http://nginx.org/ja/
非同期イベント駆動型のWEBサーバ
読み方は エンジンエックス(Nginx)
1アクセス毎に1プロセス(Apache)の思想から、1プロセス内で非同期にイベントドリブンで処理する思想へ
C10K問題に対応
適切に設定すれば、クライアント数1万(C10K)同時接続処理に対応を公式に宣言しているWEBサーバー。処理が軽く、大量リクエストに高速で応えることが可能で、静的ドキュメント(WEBサーバー上のファイル)の配信に向いている。
メモリ使用量が少ない
Apacheでは同時接続数と同じ数のプロセスが生成される為に、接続数と比例して物理メモリを大量に消費していきます。ところが、Nginxは非同期処理型イベント駆動式のため、スレッド/プロセス指向ベースと比べて物理メモリ使用量をあまり使わずに済みます。
大規模有名サービスでの使用実績
- Wikipedia
- Yahoo
ぱくたそはNginxの導入前は(Apacheサーバー)リアルタイム100程度でダウンしていたのが、Nginxを導入後では、リアルタイム1,500でも負荷率10%以下という結果でした。
@see ぱくたそ ぷれつく
WordPress.comでも採用
WordPress公式のホスティングサーバーとして採用されている実績があり、複数のWordpressサイトを同時管理するホスティングサーバーとしても十分活用できると言えます。
@see Choosing NGINX for growth at WordPress.com
ただし設定が大変 属人化の危険性
Apacheと比べると設定が複雑でとっつきにくいかと思います、一般的にはシンプルと評される事が多い設定ファイルですが、プログラムがわからない一般の人にとっては難解です。また、ITの専門家がシステムを保守しているうちはいいですが、お客様がなんらかの事情で保守契約を終了するといった場合にシステムが属人化している可能性があり、引き継ぎに支障がでるかもしれません。さらに、リアルタイム同時接続数が100に満たない99.9%のWEBサイトはApacheで十分です。やはり、それらの理由で、いまいちNginxの導入が踏み込まれていない理由かと思います。
拡大するNginxのシェア
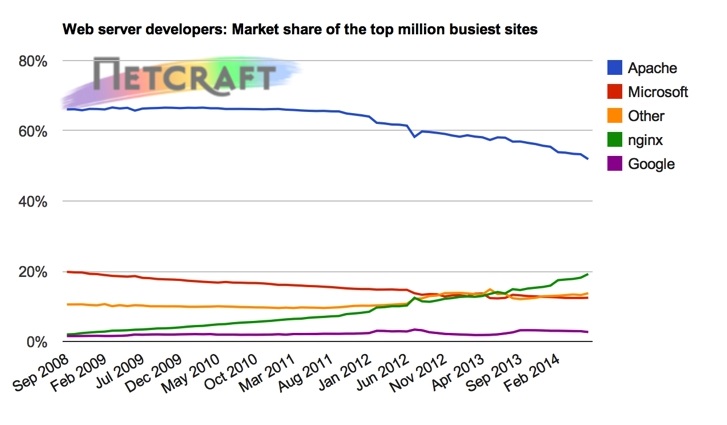
@see Netcraft 上位100万サイトのWEBサーバーシェア
Apacheのシェアが下がり、Nginxはゆるやかな上昇傾向にあります。
WEBサーバーだけじゃない
リバースプロキシとして負荷分散やキャッシュ処理にも対応。例えば弊社では、通常Nginxをリバースプロキシとしてフロントで使用し、バックエンドでApacheと連携させるといった設計を行っています。ただし、普通のコーポレイトサイトであればApache単体運用で十分です。
Nginxのインストール
今回はNginxを単体で動かす為の手順をご紹介
Apacheの停止
Apacheの停止
# service httpd stop
httpd を停止中:
# chkconfig httpd off
# chkconfig httpd –list
httpd 0:off 1:off 2:off 3:off 4:off 5:off 6:off
Nginxのインストール
CentOS6.6ならそのまま# yum install nginxでOK
# rpm -ivh http://nginx.org/packages/centos/6/noarch/RPMS/nginx-release-centos-6-0.el6.ngx.noarch.rpm
******************************************
※新しいバージョンをインストールしたい場合
# vi /etc/yum.repos.d/nginx.repo
name=nginx repo
baseurl=http://nginx.org/packages/centos/$releasever/$basearch/
gpgcheck=0
enabled=1
******************************************
# yum install nginx
オリジナルNginx設定ファイルバックアップ
# cp -a /etc/nginx/conf.d/default.conf /etc/nginx/conf.d/default.conf.org
defaultファイル削除(※バックアップしてから)
# rm -f /etc/nginx/conf.d/default.conf
Nginx起動
# service nginx start
nginx を起動中: [ OK ]
アクセスしてWelcomeページ確認
http://IPorドメイン
PHPを動かそう
PHP-FPMのインストール
# yum install php-fpm
インストール:
php-fpm.x86_64 0:5.3.3-40.el6_6
完了しました!
バックアップ
# cp -a /etc/php-fpm.d/www.conf /etc/php-fpm.d/www.conf.org
# vi /etc/php-fpm.d/www.conf
有効部分の確認
listen = 127.0.0.1:9000←php-fpmが待ち受けするポート
listen.allowed_clients = 127.0.0.1
;listen.owner = nobody
;listen.group = nobody
;listen.mode = 0666
user = apache
group = apache
pm = dynamic
pm.max_children = 50←同時に処理できるリクエスト最大数
→pmがdynamic・・・子プロセスの最大数
→pmがstatic・・・作成される子プロセス数
pm.start_servers = 5←起動時に作成される子プロセスの数(※pmがdynamicの時のみ有効)
pm.min_spare_servers = 5←アイドル状態のサーバープロセス数の最小値
pm.max_spare_servers = 35←アイドル状態のサーバープロセス数の最大値
slowlog = /var/log/php-fpm/www-slow.log
listen = 127.0.0.1:9000
↓変更
;listen = 127.0.0.1:9000
listen = /var/run/php-fpm/php-fpm.sock←追加
;listen.owner = nobody
;listen.group = nobody
;listen.mode = 0666
↓変更
;listen.owner = nobody
;listen.group = nobody
;listen.mode = 0666
listen.owner = nginx
listen.group = nginx
listen.mode = 0660
user = apache
↓変更
;user = apache
user = nginx
group = apache
↓変更
;group = apache
group = nginx
pm.max_children = 50
↓変更(標準は15で、更に5に絞る)
;pm.max_children = 50
;pm.max_children = 15
pm.max_children = 5
pm.min_spare_servers = 5
↓変更
;pm.min_spare_servers = 5
pm.min_spare_servers = 2
pm.max_spare_servers = 35
↓変更
;pm.max_spare_servers = 35
pm.max_spare_servers = 5
自動起動設定
# chkconfig php-fpm on
# chkconfig php-fpm –list
php-fpm 0:off 1:off 2:on 3:on 4:on 5:on 6:off
# service php-fpm start
php-fpm を起動中: [ OK ]
【Nginxサーバー全体の設定】
まず確認
# cat /etc/nginx/nginx.conf
[bash] # For more information on configuration, see:
# * Official English Documentation: http://nginx.org/en/docs/
# * Official Russian Documentation: http://nginx.org/ru/docs/
user nginx;
worker_processes 1;
error_log /var/log/nginx/error.log;
#error_log /var/log/nginx/error.log notice;
#error_log /var/log/nginx/error.log info;
pid /var/run/nginx.pid;←NginxのマスタープロセスのプロセスIDを保存するファイル
events {
worker_connections 1024;←1つのworkerプロセスが同時に処理できる最大コネクション
}
http {
include /etc/nginx/mime.types;←拡張子のマップリングをMINEタイプと設定
default_type application/octet-stream;←レスポンスのデフォルトのMINEタイプを設定
log_format main ‘$remote_addr – $remote_user [$time_local] “$request” ‘
‘$status $body_bytes_sent “$http_referer” ‘
‘”$http_user_agent” “$http_x_forwarded_for”‘;
access_log /var/log/nginx/access.log main;
sendfile on;←コンテンツファイルの読み込みとクライアントのレスポンスの送信にsendfile() APIを使用
#tcp_nopush on;
#keepalive_timeout 0;
keepalive_timeout 65;←同一クライアントからの再要求をサーバーが待つ時間(秒)
#gzip on;
# Load config files from the /etc/nginx/conf.d directory
# The default server is in conf.d/default.conf
include /etc/nginx/conf.d/*.conf;
}
[/bash]
では変更します。
# vi /etc/nginx/nginx.conf
worker_processes 1;
↓変更(CPUのコア数を設定)
worker_processes 3;
error_log /var/log/nginx/error.log;
↓変更(warn notice info )
error_log /var/log/nginx/error.log warn;
keepalive_timeout 65;
↓変更
keepalive_timeout 5;
#gzip on;
↓変更
#gzip on;
gzip_static on;
gzip on;
gzip_http_version 1.0;
gzip_vary on;
gzip_comp_level 1;
gzip_types text/plain
text/css
text/xml
text/javascript
application/json
application/javascript
application/x-javascript
application/xml
application/xml+rss;
gzip_disable “MSIE [1-6]\.”;
gzip_disable “Mozilla/4”;
gzip_proxied any;
gzip_buffers 16 8k;
○完成系が以下
# cat /etc/nginx/nginx.conf
# * Official English Documentation: http://nginx.org/en/docs/
# * Official Russian Documentation: http://nginx.org/ru/docs/
user nginx;
#worker_processes 1;
worker_processes 3;
worker_connections 1024;
}
http {
include /etc/nginx/mime.types;
default_type application/octet-stream;
log_format main ‘$remote_addr – $remote_user [$time_local] “$request” ‘
‘$status $body_bytes_sent “$http_referer” ‘
‘”$http_user_agent” “$http_x_forwarded_for”‘;
access_log /var/log/nginx/access.log main;
sendfile on;
#tcp_nopush on;
#keepalive_timeout 0;
keepalive_timeout 5;
#gzip on;
gzip_static on;
gzip on;
gzip_http_version 1.0;
gzip_vary on;
gzip_comp_level 1;
gzip_types text/plain
text/css
text/xml
text/javascript
application/json
application/javascript
application/x-javascript
application/xml
application/xml+rss;
gzip_disable “MSIE [1-6]\.”;
gzip_disable “Mozilla/4”;
gzip_proxied any;
gzip_buffers 16 8k;
# Load config files from the /etc/nginx/conf.d directory
# The default server is in conf.d/default.conf
include /etc/nginx/conf.d/*.conf;
}
[/bash]
【Nginx個別設定ファイル】
まずは確認してみよう。
# cat /etc/nginx/conf.d/default.conf
[bash] #
# The default server
#
server {
listen 80 default_server;
server_name _;
#charset koi8-r;
#access_log logs/host.access.log main;
# Load configuration files for the default server block.
include /etc/nginx/default.d/*.conf;
location / {
root /usr/share/nginx/html;
index index.html index.htm;
}
error_page 404 /404.html;
location = /404.html {
root /usr/share/nginx/html;
}
# redirect server error pages to the static page /50x.html
#
error_page 500 502 503 504 /50x.html;
location = /50x.html {
root /usr/share/nginx/html;
}
# proxy the PHP scripts to Apache listening on 127.0.0.1:80
#
#location ~ \.php$ {
# proxy_pass http://127.0.0.1;
#}
# pass the PHP scripts to FastCGI server listening on 127.0.0.1:9000
#
#location ~ \.php$ {
# root html;
# fastcgi_pass 127.0.0.1:9000;
# fastcgi_index index.php;
# fastcgi_param SCRIPT_FILENAME /scripts$fastcgi_script_name;
# include fastcgi_params;
#}
# deny access to .htaccess files, if Apache’s document root
# concurs with nginx’s one
#
#location ~ /\.ht {
# deny all;
#}
}
[/bash]
バーチャル用設定ファイルを作成
# vi /etc/nginx/conf.d/あなたのドメイン.com.conf
[bash] server {
# ポートを指定
listen 80;
#サーバー名を指定
server_name あなたのドメイン.com;
# ドキュメントルート
root /home/あなたのドメイン.com/public_html/;
# インデックスファイル指定
index index.php index.html index.htm;
# 実ファイルがない場合のアクセスファイル
try_files $uri $uri/ /index.php;
location / {
# WordPress パーマリンク設定を利用可能にする
if (!-e $request_filename) {
rewrite ^.+?(/wp-.*) $1 last;
rewrite ^.+?(/.*\.php)$ $1 last;
# ドキュメントルートから WordPress までの相対パス
# (ドキュメントルートにインストールしたため相対パスは記入なし)
rewrite ^ /index.php last;
}
}
# PHP-FPM 設定
location ~ \.php$ {
fastcgi_pass unix:/var/run/php-fpm/php-fpm.sock;
fastcgi_index index.php;
fastcgi_param SCRIPT_FILENAME $document_root$fastcgi_script_name;
include fastcgi_params;
}
}
[/bash]
nginxがセッションを使えるようにする
# ls -la /var/lib/php/session/
[bash] 合計 296drwxrwx— 2 root apache 4096 10月 31 05:17 2014 .
drwxr-xr-x 3 root root 4096 12月 16 17:54 2014 ..
-rw——- 1 apache apache 24574 12月 16 18:59 2014 sess_3d3ape6d0buo542j2lkmu2suoscmis93
-rw——- 1 apache apache 36334 12月 20 16:14 2014 sess_7uc8ho6jrabdj81fuilpuh1838bt8khg
-rw——- 1 apache apache 25222 12月 29 07:27 2014 sess_aq9o59rtj71onvn2icvjokj955nfk1ur
-rw——- 1 apache apache 54067 12月 29 12:52 2014 sess_b9k30m87po1t559k26bcoav21ljul0oa
-rw——- 1 apache apache 2776 12月 27 16:01 2014 sess_e35pc1b7m68tslc54n6as7m6urifrm72
-rw——- 1 apache apache 24582 12月 17 23:34 2014 sess_e3s4v8i12sbqo8m9fr387arvuje2moik
-rw——- 1 apache apache 58937 1月 20 11:41 2015 sess_ehe768vh9vg62kev8q1rtor1he3fi0aj
-rw——- 1 apache apache 25642 12月 27 16:16 2014 sess_hfh3v1142ppgcqqhoko2vqb05d94otd8
-rw——- 1 apache apache 23018 12月 20 14:28 2014 sess_ip76uo209eskskpt0l507e3fgmflli71
[/bash]
nginxへ所有権を変える。
# chown -R nginx.nginx /var/lib/php/session/
コンフィグテスト
# /etc/init.d/nginx configtest
nginx: the configuration file /etc/nginx/nginx.conf syntax is ok
nginx: configuration file /etc/nginx/nginx.conf test is successful
反映させる。
# service nginx restart
Basic認証を設置するには
# htpasswd -c /home/あなたのドメイン.com/public_html/.htpasswd あなたのドメイン.com
#BASIC認証の2行を追加します。
# vi /etc/nginx/conf.d/あなたのドメイン.com.conf
[bash] server {
# ポートを指定
listen 80;
#サーバー名を指定
server_name あなたのドメイン.com;
# ドキュメントルート
root /home/あなたのドメイン.com/public_html/;
# インデックスファイル指定
index index.php index.html index.htm;
# 実ファイルがない場合のアクセスファイル
try_files $uri $uri/ /index.php;
location / {
# WordPress パーマリンク設定を利用可能にする
if (!-e $request_filename) {
rewrite ^.+?(/wp-.*) $1 last;
rewrite ^.+?(/.*\.php)$ $1 last;
# ドキュメントルートから WordPress までの相対パス
# (ドキュメントルートにインストールしたため相対パスは記入なし)
rewrite ^ /index.php last;
}
# BASIC認証
auth_basic “Restricted”;
auth_basic_user_file /home/あなたのドメイン.com/.htpasswd;
}
# PHP-FPM 設定
location ~ \.php$ {
fastcgi_pass unix:/var/run/php-fpm/php-fpm.sock;
fastcgi_index index.php;
fastcgi_param SCRIPT_FILENAME $document_root$fastcgi_script_name;
include fastcgi_params;
}
}
[/bash]
コンフィグテスト
# /etc/init.d/nginx configtest
nginx: the configuration file /etc/nginx/nginx.conf syntax is ok
nginx: configuration file /etc/nginx/nginx.conf test is successful
再起動させ反映させる。
# service nginx restart
nginx を停止中: [ OK ]
nginx を起動中: [ OK ]
NginxとApacheの平行運用はこちら
次の記事:高速化NginxとApacheを平衡運用 proxy cache